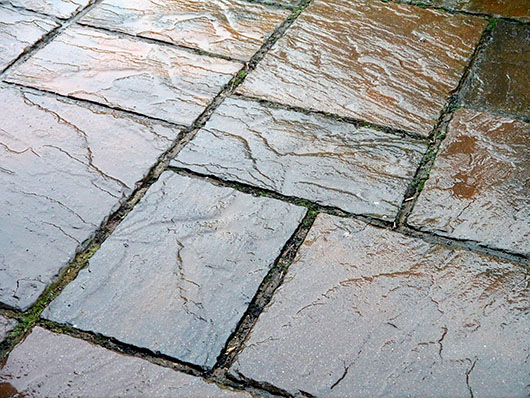
It’s encouraging that 27% of Americans are willing to spend more on products that support sustainability. Spending more on sustainable products helps protect the environment and supports long-lasting options. People can show their commitment by choosing eco-friendly flooring like natural slate. Natural slate floor tiles are strong, durable, and unique in look. However, because of their weight, using them in a tile installation can be tricky. They also require careful leveling and proper sealing for the best results. Luckily, our guide covers advanced techniques to help you install slate tiles perfectly and make them last. Whether you’re a pro or a DIY enthusiast, there’s something to learn. Read on for more insights:


Precision Subfloor Evaluation
Carefully checking the subfloor is key to a good tile job. A laser level helps ensure the subfloor is even, reducing problems like uneven tiles and making the floor look better. To prepare the subfloor, stick to the following steps:
- Place the laser level in the center of the room for accurate readings
- Rotate the laser to find any high or low spots on the subfloor
- Write down any uneven spots and measure them
- Use a self-leveling compound to fill in any dips and let it dry according to the instructions
- Add extra support to the subfloor if it moves a lot, especially in older homes
Find all uneven spots; even small ones can cause problems. Let the self-leveling compound fully dry before installing tiles to ensure a strong bond. A strong, stable subfloor is important when considering slate vs ceramic tiles, as slate is heavier and needs extra support to avoid issues.
Also, reinforce the subfloor if needed, especially in older homes or areas with potential movement. Ensure the subfloor is perfectly level to avoid issues with uneven tiles. Lastly, use self-leveling compounds to fix any dips or uneven areas.
Enhanced Tile Layout Planning
Enhanced tile layout planning means setting up a grid on the floor to ensure tiles are placed correctly. This helps make the floor look good and places the best tiles in the best spots. So, how do you achieve it?
- Use layout software to plan how the tiles will go and create a grid pattern
- Mark this grid on the floor with a chalk line
- Dry lay some tiles on the grid to check if the pattern looks right
- Adjust the grid to place the best tiles in the most visible areas
- Sort tiles before installation to mix colors and textures for a balanced look
On the cautionary side, remember to check the grid layout carefully before you start installing slate tiles. Fix any small mistakes now, as they can be hard to correct later. You should also ensure chalk lines are clear and stay visible throughout the installation.

Back Buttering Technique
The back buttering technique involves spreading a thin mortar layer on the back of each tile and the floor. This helps ensure the tiles stick well and reduces the chance of hollow spots. To begin, spread a thin layer of mortar on the back of each tile with a notched trowel.
Then, add more mortar to the floor with the same trowel and press the tile down, twisting slightly to set it. Check occasionally to make sure the tile has full coverage and no gaps. Avoid using too much mortar to prevent squeezing out.
Using a Tile Wet Saw With a Diamond Blade
Using a tile wet saw with a diamond blade is a great way to cut natural slate tiles neatly and accurately. This method prevents chipping and ensures your tiles fit perfectly. To use the saw, set it up on a stable surface and fill the water reservoir as directed.
Adjust the saw’s fence and guide for the tile size, then carefully align the tile with the blade. Turn on the saw and push the tile slowly through the blade. Always wear personal protective equipment like safety goggles and gloves to protect yourself.

Advanced Grouting Techniques
Advanced grouting techniques help you get a clean, professional finish with slate tiles. They include preventing grout from staining the slate and ensuring an even application. Here’s how to embrace these techniques:
- Put a grout-release product on the tiles to prevent stains
- Let it dry completely before moving on
- Mix the grout until it’s easy to use
- Spread the grout with a grout float as you press it into the gaps
- Wipe off extra grout without removing grout from the gaps
Either way, use a high-quality, polymer-modified thin-set mortar for natural stone flooring to ensure a strong bond. The adhesive should be on the back of each tile to avoid hollow spots. Choose the right grout width for slate tiles and use a sealer or grout release to prevent stains.
Applying a Pre-Installation Sealer
Before laying the durable slate tiles, apply a pre-installation penetrating sealer. The sealer helps protect the tiles from grout stains and moisture, making cleaning easier. So, choose one that enhances the slate’s natural beauty without changing its appearance.
Apply the sealer evenly across each tile’s surface, allowing it to dry completely. Make sure the sealer is compatible with your grout for a consistent finish. It will help ensure both the tiles and grout are protected.
Post-Installation Maintenance
After installing the tiles and grout, let the grout cure fully before applying a final sealer. Curing helps protect the grout and slate from stains and moisture. A penetrating sealer will enhance the slate’s natural beauty while letting you enjoy slate flooring benefits.
Wait for the grout to cure per the manufacturer’s instructions, usually 24 to 72 hours. Apply a final penetrating sealer to the slate tiles and grout to ensure they are well-protected. For final cleaning, use a non-abrasive cleaner and a soft cloth to remove grout haze without damaging the slate.
Transform Your Space With Natural Slate Floor Tiles Today
Installing natural slate floor tiles can be a rewarding experience. Follow the tips in this guide for a smooth and lasting installation. Pay close attention to substrate preparation, tile choice, and grout application for a professional finish.
Want top results for your tiling projects? RUBI offers a wide range of tools and accessories for pros and DIYers. Check out our selection and see how we can help with your tiling needs.


Post a comment