
Knowing how to remove silicone from tiles is crucial when you are a tiler. It can be a daunting task, especially if you’re not familiar with the process. However, it’s important to learn this step when you learn how to tile. Addressing the issue promptly is always best. Cracked or peeling silicone can lead to water damage and mould growth. In this blog post we will guide you through removing silicone from tiles and reapplying it to ensure a watertight seal.


Why Remove Silicone Sealant?
Before diving into the removal process, let’s discuss why removing old or damaged silicone is necessary. Silicone sealant is used in bathrooms and kitchens to prevent water from seeping into gaps and causing damage. Over time, silicone can crack, peel, or develop mould. Here’s why it’s essential to address these issues:
- Prevent Water Damage: Cracked or peeling silicone allows water to seep into gaps, leading to water damage in walls, floors, and cabinets.
- Avoid Mould Growth: Water trapped behind silicone can create a perfect environment for mould and mildew, which can pose health risks.
- Ensure a Strong Seal: Applying new silicone over old, damaged silicone won’t create a strong bond and can lead to further problems. Removing old silicone ensures a fresh, strong seal that can withstand daily use.
Tools You’ll Need
Knowing how to remove silicone from tiles requires some specific tools to do the job efficiently. Here are the essential tools and materials you’ll need:
- Utility Knife or Razor Blade Scraper: For cutting through the silicone and scraping it off tiles.
- Plastic Scraper: To avoid scratching tiles while removing silicone.
- Silicone Sealant Remover: A chemical solution that helps soften and dissolve silicone for easier removal.
- Rubbing Alcohol or Acetone: For cleaning residue and preparing the surface for new silicone.
- Protective Gloves and Safety Glasses: To protect your skin and eyes from chemicals.
- Paper Towels or Clean Cloths: For wiping away silicone and cleaning surfaces.
- Masking Tape: For creating clean edges when applying new silicone.
How to Remove Silicone From Tiles
Now that you have your tool kit, we will walk you through how to remove silicone from tiles.
Prep The Area
Remove any items from the area where you’ll be working, such as shower caddies, soap dishes, or towels. Ensure the area is dry to prevent slipping. Ventilate the room – it is always important to ventilate a room if you are using chemicals.
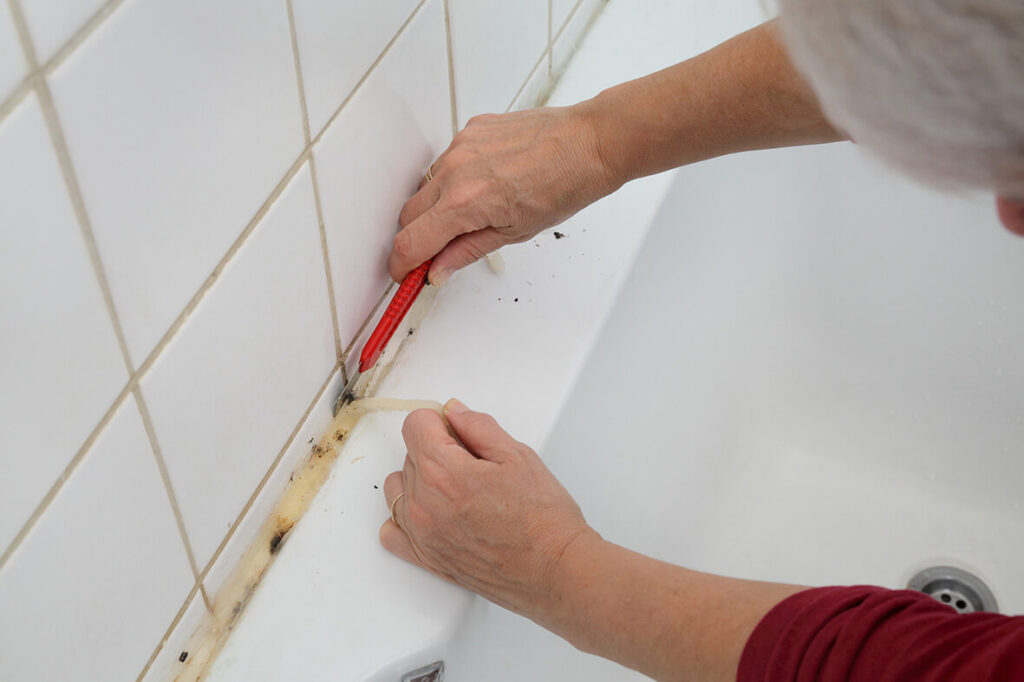
Score the Silicone
Use a utility knife or razor blade scraper to carefully score the silicone along its edges. Be cautious not to scratch the tiles. Going slowly is best here if you don’t have much experience. Cut through the silicone sealant along the seams where it meets the tiles, creating an entry point for removal.
Remove the Silicone
Use a plastic scraper, or an old credit card, to gently pry the silicone away from the tiles. Start at one end and work your way along the seam. If the silicone is stubborn, apply a silicone sealant remover according to the manufacturer’s instructions. Allow it to sit for the recommended time to soften the silicone.
Clean the Residue
Once you know how to remove silicone from tiles, wipe the area with rubbing alcohol or acetone to clean any remaining residue. Make sure to not let the rubbing alcohol or acetone sit on your tiles for an extended period of time. Use a clean cloth or paper towel to ensure the surface is smooth and free of debris. Make sure to clean up any silicone remover, rubbing alcohol or acetone thoroughly once the silicone residue is removed.
Inspect for Damage
Check the tiles and surrounding areas for any damage or mould. Address any issues before proceeding with new silicone.

How to Reapply Silicone Sealant
Once you’ve removed the old silicone and prepared the area, it’s time to apply new silicone sealant. Proper application ensures a strong, long-lasting seal. Follow these steps for a successful reapplication:
Choose the Right Silicone
Select a high-quality silicone sealant designed for bathrooms or kitchens, as these are mould-resistant and waterproof.
Prepare the Area
Ensure the area is clean, dry, and free of dust or debris. Use masking tape along the edges of the seam to create clean lines and prevent silicone from spreading onto the tiles.
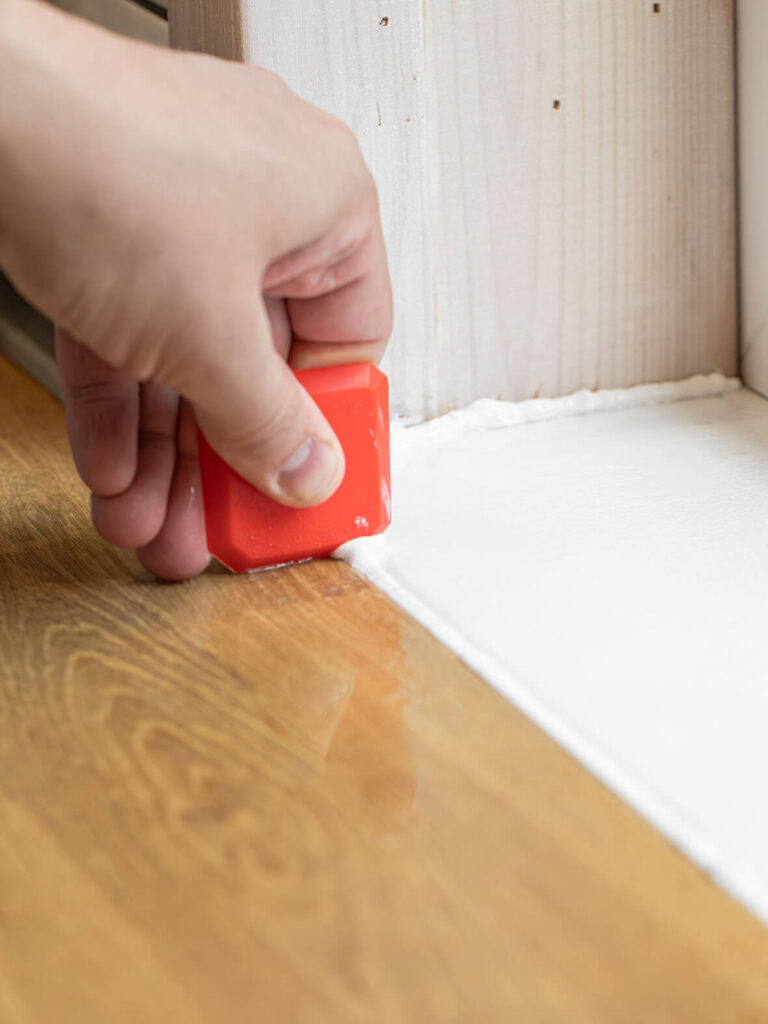
Apply the Silicone
Cut the nozzle of the silicone tube at a 45-degree angle to control the flow. Hold the nozzle with the bevel down for the cleanest application. Using a caulk gun, apply the silicone evenly along the seam, ensuring it fills the gap completely. Smooth the silicone with a wet finger or a silicone smoothing tool to create a neat, even finish.
Consider Weight and Pressure
If you’re sealing around a bathtub or shower, fill it with water or place weights inside before applying silicone. This simulates the weight of people using the bath or shower and prevents the silicone from cracking when the tub is later filled or used.
Allow to Cure
Follow the manufacturer’s instructions for curing time. Avoid using the area until the silicone is fully cured to ensure a strong seal.
Remove Masking Tape
Carefully remove the masking tape before the silicone fully cures to achieve clean edges.
Tips for Maintaining Silicone Seals
Maintaining your silicone seals will help extend their lifespan and keep your bathroom or kitchen in top condition. Here are some tips:
- Regular Inspection: Periodically check your silicone seals for signs of damage or mould. Address issues promptly to prevent further damage.
- Keep Surfaces Dry: Wipe down shower areas and kitchen counters to reduce moisture and prevent mould growth.
- Use Mould-Resistant Products: When choosing cleaning products, opt for those with mould-resistant properties to protect your silicone seals.
- Ventilate Properly: Ensure proper ventilation in bathrooms and kitchens to reduce humidity levels and prevent mould growth.
Removing and reapplying silicone sealant is essential to maintaining a clean, watertight seal in your bathroom or kitchen. By following this guide, you’ll ensure that your silicone seals are effective and long-lasting. Remember, addressing damaged silicone promptly can save you from costly repairs and health hazards. Whether you’re a DIY enthusiast or a novice, these steps will help you achieve professional results.
By understanding how to remove silicone from tiles and reapply it correctly, you can maintain a clean and functional space free from water damage and mould growth. Follow these steps carefully to ensure a successful silicone removal and application process. Happy sealing!
Post a comment